
打算弄個 Risc-V 做個自己的小 Project ,摸了一下大概才知道怎麼入門
這篇是筆記,適合初學者
OS: ubuntu 22.04 / 24.04
Table of Contents
下載和 compile source code
理論上用 linux-on-litex-vexriscv 照著作就可以了,不過中間還是有很多邊邊角角的小問題要處理 ,如果對系統不夠熟的人會在這邊卡很久。
Install Ubuntu Packages
sudo apt-get install -y build-essential device-tree-compiler wget git python3-setuptools python3-dev
sudo apt-get install -y libssl-dev libncurses-dev libeigen3-dev
sudo apt-get install -y libevent-dev libjson-c-dev libboost-iostreams-dev
sudo apt-get install -y libreadline-dev tcl-dev libffi-dev bison flex gawk gtkwave

sudo apt-get install -y file bc unzip meson
sudo apt-get install -y libboost-dev libboost-filesystem-dev libboost-thread-dev libboost-program-options-dev libboost-python-dev libboost-all-dev


# 24.04
sudo apt-get install -y python3-venv
Install SBT
sudo apt-get update
sudo apt-get install apt-transport-https curl gnupg -yqq
echo "deb https://repo.scala-sbt.org/scalasbt/debian all main" | sudo tee /etc/apt/sources.list.d/sbt.list
echo "deb https://repo.scala-sbt.org/scalasbt/debian /" | sudo tee /etc/apt/sources.list.d/sbt_old.list
curl -sL "https://keyserver.ubuntu.com/pks/lookup?op=get&search=0x2EE0EA64E40A89B84B2DF73499E82A75642AC823" | sudo -H gpg --no-default-keyring --keyring gnupg-ring:/etc/apt/trusted.gpg.d/scalasbt-release.gpg --import
sudo chmod 644 /etc/apt/trusted.gpg.d/scalasbt-release.gpg
sudo apt-get update
sudo apt-get -y install sbt
Install OpenJDK
這邊我們用 OpenJDK 17
sudo apt-get install -y openjdk-17-jdk openjdk-17-jre重編 cmake
內建的 cmake 看起來版本太低不能用,所以要下載 cmake 手動編譯
wget https://github.com/Kitware/CMake/releases/download/v4.0.3/cmake-4.0.3.tar.gz
tar xvf cmake-4.0.3.tar.gz
cd cmake-4.0.3
./configure
make -j `nproc`
sudo make install
下載 linux-on-litex-vexriscv
編 buildroot 要指定 linux-on-litex-vexriscv ,所以先下載
git clone https://github.com/litex-hub/linux-on-litex-vexriscv編 Buildroot 編出 Risc-V 的 Cross Compiler
我因為是在其他 CPU 的平台上跑,所以只能自己編 buildroot ,還好 buildroot 已經很成熟了,只是要花時間編出來而已,第一次有錯誤訊息沒關係,確認 output/host/bin/ 下有”riscv32-” 開頭的 toolchain 就可以了
等到編完 litex 之後再回來重編一次 buildroot 即可
git clone http://github.com/buildroot/buildroot
cd buildroot
make BR2_EXTERNAL=../linux-on-litex-vexriscv/buildroot/ litex_vexriscv_defconfig
make
iverilog 版本太舊,重編 iverilog
iverilog 和 yosys 都要注意不能用到 ubuntu 系統內建的版本,它們都太舊了
都要手動重裝新版的
sudo apt-get install -y autoconf gperf make gcc g++ bison flex
git clone https://github.com/steveicarus/iverilog.git
cd iverilog
autoconf
./configure
sudo make -j `nproc` install
下載 yosys/prjtrellis/nextpnr
主要是參照這篇 LiteX/VexRiscv 簡介與使用 (二) 始有晝夜 ,但是因為已經是幾年前了,有些東西有點小差異,不過不影響,目錄就用我的工作目錄
這邊要小心一點,最好是先清空相關的程式碼,像是 /nvme/cpu/sysroot/* 和 /usr/local/bin 下的某些檔案,我就吃了虧卡關了很久
如果是 Ubuntu 24.04 ,要先照下面一節的方式先切到 venv 的環境再安裝
# 如果還沒做就先將路徑加上去
# 編 buildroot 時不能加入 buildroot 的 path,要編 litex 時再加入即可export PATH=$PATH:/usr/local/bin:/nvme/cpu/buildroot/output/host/bin/:/nvme/cpu/sysroot/bin/:~/.local/bin:

mkdir -p /nvme/cpu/sysroot
cd /nvme/cpu
git clone --recursive https://github.com/YosysHQ/yosys
git clone --recursive https://github.com/YosysHQ/prjtrellis
git clone --recursive https://github.com/YosysHQ/nextpnr
cd yosys
make PREFIX="/nvme/cpu/sysroot" CONFIG=gcc ENABLE_TCL=1 ENABLE_ABC=1 ENABLE_GLOB=1 ENABLE_PLUGINS=1 ENABLE_LIBYOSYS=1 ENABLE_PROTOBUF=1 ENABLE_ZLIB=1 ENABLE_PYOSYS=1 test all install -j `nproc`
cd ..
cd prjtrellis/libtrellis
cmake -DCMAKE_INSTALL_PREFIX=/nvme/cpu/sysroot .
make install -j `nproc`
cd ../../
cd nextpnr
cmake . -DARCH=ecp5 -DTRELLIS_INSTALL_PREFIX=/nvme/cpu/sysroot -B build
cd build
sudo make install -j `nproc`
下載和編 litex
ubuntu 22.04 可以用 –user ,但是 24.04 就強制要用 venv 要先有環境
cd /nvme/cpu
python3 -m venv litex-venv
source litex-venv/bin/activate
Ubuntu 22.04
cd /nvme/cpu
wget https://raw.githubusercontent.com/enjoy-digital/litex/master/litex_setup.py
chmod +x litex_setup.py
./litex_setup.py --init --install --user
Ubuntu 24.04
./litex_setup.py --init --installCompile Lite-X
cd /nvme/cpu/linux-on-litex-vexriscv
./make.py --board=versa_ecp5 --cpu-count=1 --build
跑 Simulation
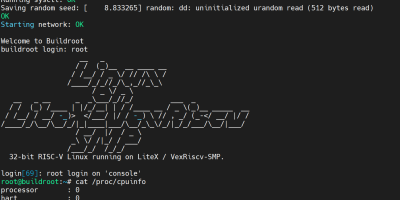
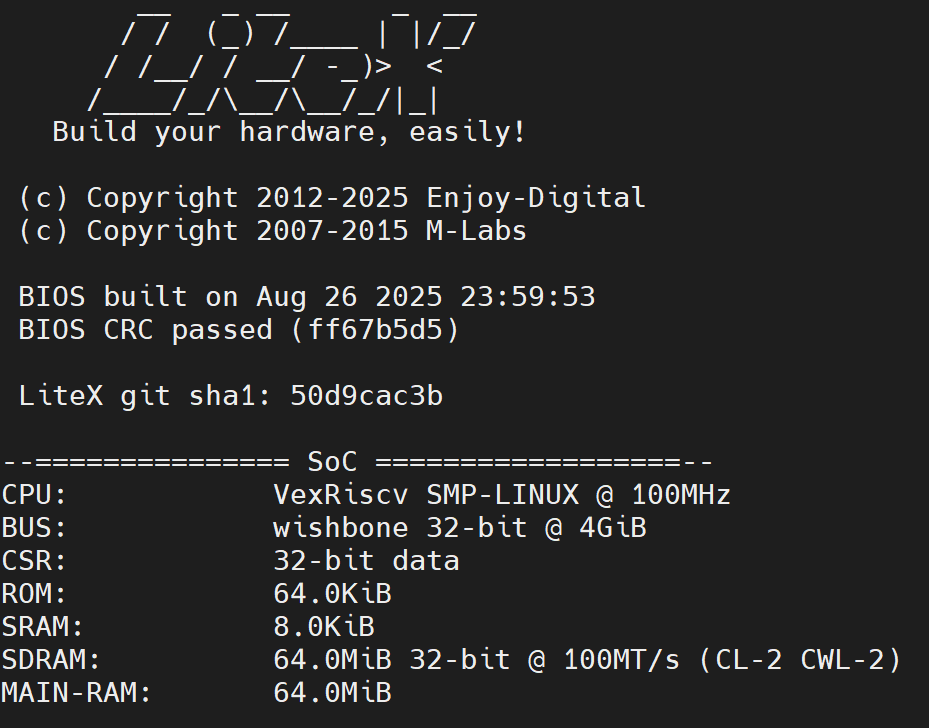
順利的話這時環境應該 OK 了,可以跑 simulation 了
先下載 Linux images 到 images
cd /nvme/cpu/linux-on-litex-vexriscv/images
wget https://github.com/litex-hub/linux-on-litex-vexriscv/files/8331338/linux_2022_03_23.zip
unzip linux_2022_03_23.zip
跑 simulation
這時就可以跑 simulation 了,不過我跑了 64 Cores 好像更慢,看起來給愈多 code 會跑的更大,像是變 SMP 或是跑到 100Mhz (一核用 1Mhz)
可能要花時間設參數,–jobs 到是可以設大一點
./sim.py

# 或是
./sim.py

# 或是
./sim.py  --jobs `nproc` --threads `nproc`

Build FPGA Bitstream Image
以下就是編 orange_crab FPGA 板子的 command
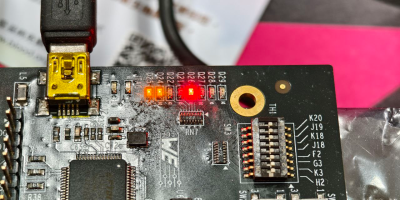
./make.py --board=orange_crab --cpu-count=1 --build不過我編出來會 .dts failed
可以改編 versa_ecp5 ,這是 ecp5 的公板,目前應該只有 ecp5 可以靠Trellis/Yosys/nextpnr 這三個 Open Source 的軟體編出 FPGA 所需的 bitstream image,orange_crab 也是基於 ecp5 的 FPGA.
./make.py --board=versa_ecp5 --cpu-count=1 --build
不過我寫這篇的時候還沒買 FPGA ,所以燒到板子上測試要等下一篇了
Error Messages
Ram_1w_1rs_Generic.v:2:8: Timescale missing on this module as other modules have it
原始錯誤訊息
%Error-TIMESCALEMOD: /nvme/cpu/pythondata-cpu-vexriscv-smp/pythondata_cpu_vexriscv_smp/verilog/Ram_1w_1rs_Generic.v:2:8: Timescale missing on this module as other modules have it (IEEE 1800-2017 3.14.2.2)
                     /nvme/cpu/pythondata-cpu-vexriscv-smp/pythondata_cpu_vexriscv_smp/verilog/VexRiscvLitexSmpCluster_Cc1_Iw32Is4096Iy1_Dw32Ds4096Dy1_ITs4DTs4_Ldw32_Ood_Hb1.v:8:8: ... Location of module with timescale
    8 | module VexRiscvLitexSmpCluster_Cc1_Iw32Is4096Iy1_Dw32Ds4096Dy1_ITs4DTs4_Ldw32_Ood_Hb1 (
      |        ^~~~~~~~~~~~~~~~~~~~~~~~~~~~~~~~~~~~~~~~~~~~~~~~~~~~~~~~~~~~~~~~~~~~~~~~~~~~~~
%Error: Exiting due to 1 error(s)
        ... See the manual and https://verilator.org for more assistance.
make: *** [/nvme/cpu/litex/litex/build/sim/core/Makefile:44: sim] Error 1
make: Leaving directory '/nvme/cpu/linux-on-litex-vexriscv/build/sim/gateware'
Testing expectations for wide_thru_priority.v ..Test: code_verilog_tutorial_fsm_full -> ok

Test: code_verilog_tutorial_parity -> ok
修改檔案 /nvme/cpu/pythondata-cpu-vexriscv-smp/pythondata_cpu_vexriscv_smp/verilog/Ram_1w_1rs_Generic.v 加上一行
diff --git a/pythondata_cpu_vexriscv_smp/verilog/Ram_1w_1rs_Generic.v b/pythondata_cpu_vexriscv_smp/verilog/Ram_1w_1rs_Generic.v
index c6e6a96..6a57a2e 100644
--- a/pythondata_cpu_vexriscv_smp/verilog/Ram_1w_1rs_Generic.v
+++ b/pythondata_cpu_vexriscv_smp/verilog/Ram_1w_1rs_Generic.v
@@ -1,3 +1,5 @@
+`timescale 1ns/1ps
+

 module Ram_1w_1rs #(
         parameter integer wordCount = 0,
ERROR: Module `\ECLKBRIDGECS’ referenced in module `\orange_crab’ in cell `\ECLKBRIDGECS’ is not part of the design
Generating RTLIL representation for module `\VexRiscvLitexSmpCluster_Cc1_Iw32Is4096Iy1_Dw32Ds4096Dy1_ITs4DTs4_Ldw128_Ood_Hb1'. ERROR: Module `\ECLKBRIDGECS' referenced in module `\orange_crab' in cell `\ECLKBRIDGECS' is not part of the design.
yosys 太舊,我是裝到系統的 yosys ,移除掉系統的 yosys 再自己編 yosys 就可以了
Reference
LiteX/VexRiscv 簡介與使用 (二) 始有晝夜
LiteX
linux-on-litex-vexriscv
Prebuilt Bitstreams and Linux/OpenSBI images (抓 Linux Kernel 用)
Orange Crab 主網站
OSS CAD Suite
Buildroot

發佈留言