

DPDK is a very popular infrastructure in high speed packet process domain, some applications will used the same architecture to process packet, like EPC.
For Ubuntu 18.04, it used dpdk 17.11, it not good for some other application like dpdk pktgen, but enough for testpmd and l3fwd test. here is some personal note for setup whole environment.
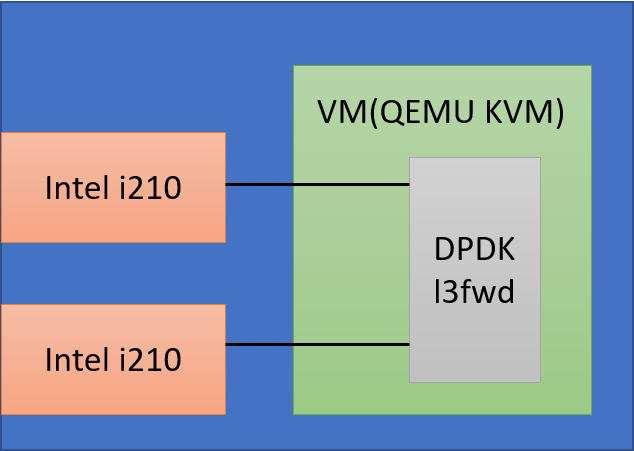
Hardware : Ampere eMag Server with 128GB Memory
Network Card: Intel i210 Gigabit NIC Card * 2
HOST means commands and instructions on host machines
VM means commands and instructions inside VM
Prepare Environment
Apt source
First, please add deb-src to your database, edit file /etc/apt/source.list and removed all “#” before deb-src, then, run follow commands to update apt database (suppose all commands run with sudo or root in this article)
sed -i 's/# deb-src/deb-src/g' sources.list
apt update
Install Packages
It needs to install relative packages in host
sudo apt install -y dpdk dpdk-dev dpdk-doc
Only needs to install on HOST.
sudo apt install -y qemu-efi bridge-utils
It will install all necessary dpdk packages in host.
Preload Module
It needs to preload vfio-pci modules by default, run following command
echo "vfio-pci" >> /etc/modules
Configure Line Kernel boot command
It needs to reserve hugepages memory space for Linux kernel, it reserves 32 pages and each pages 1GB, total 32GB. Please modify /etc/default/grub , and add hugepagesz=1GB hugepages=32 to GRUB_CMDLINE_LINUX, ex:
GRUB_CMDLINE_LINUX=”console=tty0 hugepagesz=1GB hugepages=32″
then run foloowing command to update grub.cfg
update-grub
Mount hugetlbfs by default
If wants to use hugepage, it needs to mount hugetlbfs somewhere, we can create a directory, ex: /mnt/hugepages and mount hugetblsfs there by default.
mkdir -p /mnt/hugepages
echo "nodev   /mnt/hugepages                  hugetlbfs       defaults,pagesize=1G    0 0 none" >> /etc/fstab
Bind Network Card for DPDK
It wants to let DPDK use current network card, it needs to bind the network card with dpdk. dpdk-devbind command is a useful command.
List current command
 $ dpdk-devbind --status
 Network devices using kernel driver
 0001:01:00.0 'I210 Gigabit Network Connection 1533' if=enP1p1s0 drv=igb unused=vfio-pci
 0002:01:00.0 'I210 Gigabit Network Connection 1533' if=enP2p1s0 drv=igb unused=vfio-pci
 0006:01:00.0 'I210 Gigabit Network Connection 1533' if=enP6p1s0 drv=igb unused=vfio-pci Active
There are three network card in the machine, we would like to bind 1:1:0.0 and 2:1:0.0 to vfio-pci driver. please used following command to bind those network cards.
dpdk-devbind -b vfio-pci 0001:01:00.0 0002:01:00.0
and check status again
 $ dpdk-devbind --status

Network devices using DPDK-compatible driver
============================================
0001:01:00.0 'I210 Gigabit Network Connection 1533' drv=vfio-pci unused=igb
0002:01:00.0 'I210 Gigabit Network Connection 1533' drv=vfio-pci unused=igb

Network devices using kernel driver
============================================
0006:01:00.0 'I210 Gigabit Network Connection 1533' if=enP6p1s0 drv=igb unused=vfio-pci Active
Both network cards would be under Network devices using DPDK-compatible driver .
Prepare QEMU environment
Set up bridge devices
We already install bridge-utils before, now, it should configure bridge devices.
mkdir -p /etc/qemu
echo "allow br0" > /etc/qemu/bridge.conf
Because there is only one network interface on machine, we should use this interface as bridge device, save text below and modify it to fit your environment.
 ORIGNIC=enP6p1s0

 ip addr flush enP6p1s0


 brctl addbr br0
 brctl addif br0 enP6p1s0
 ifconfig br0 up
 ifconfig br0 192.168.110.1 netmask 255.255.0.0
 route add default gw 192.168.1.1


 echo nameserver 8.8.8.8 >> /etc/resolv.conf
Run script, command brctl show will show how whether it configure property or not.
Prepare QEMU image
Ubuntu 18.04 cloud image is here
wget http://ftp.yzu.edu.tw/Linux/ubuntu-cloud-images/bionic/current/bionic-server-cloudimg-arm64.img
and please refer this article to change cloud image’s password
Change Ubuntu Cloud Image Password, before use it, don’t forget to increase cloud image size. 20G is enough for test.
qemu-img resize bionic-server-cloudimg-arm64.img +20G
Next step is to create bios and nvram for qemu image boot.
dd if=/dev/zero of=flash0.img bs=1M count=64
dd if=/usr/share/qemu-efi/QEMU_EFI.fd of=flash0.img conv=notrunc
dd if=/dev/zero of=flash1.img bs=1M count=64
Run Qemu
Here is qemu command, save text below and run it
 IMAGE=bionic-server-cloudimg-arm64.img
 sudo qemu-system-aarch64 -name vm1 \
         -machine virt,gic_version=3,accel=kvm,usb=off \
         -cpu host -m 8192 \
         -smp 12,sockets=1,cores=12,threads=1 \
         -nographic -nodefaults \
         -pflash flash0.img -pflash flash1.img \
         -device vfio-pci,host=0001:01:00.0 \
         -device vfio-pci,host=0002:01:00.0 \
         -drive file=$IMAGE,if=none,id=disk1 \
         -device virtio-blk-device,scsi=off,drive=disk1,id=virtio-disk1,bootindex=1 \
         -netdev tap,id=net0,ifname=tap0 \
         -device virtio-net-device,netdev=net0 \
         -mem-path /mnt/hugepages \
         -serial telnet::9001,server,nowait > guest1_log.txt 2>> guest1_log.txt &
 sleep 5
 brctl addif br0 tap0
-m 8192 : use 8G RAM for VM
–mem-path will use /mnt/hugepages for VM memory
it will create a network device tap0 for bridge device interface between VM and host. and create a telnet server on port 9001, it can use “telnet 9001” to get console, I would like to suggest to use ssh if it can access console.
Remove cloudinit service
it needs to remove cloud-initramfs-copymods, it will copy modules from ramdisk to harddriver, and cloud-init, it’s for some cloud service like aws(?)
removed them would help system runs better.
apt remove cloud-initramfs-copymods cloud-init
Disable Services
After boot, it needs to disable some default service to improve speed, here is some services can be disabled. (needs run those command with root)
systemctl disable ufw
systemctl disable lxcfs
systemctl disable atd
systemctl disable cron
systemctl disable irqbalance
systemctl disable apparmor
systemctl disable apport
systemctl disable ebtables
systemctl disable grub-common
systemctl disable unattended-upgrades
systemctl disable iscsid
Most import service is irqbalance, without disable it, performance will be drop down.
Now, it can reboot VM now.
Prepare QEMU environment
Prepare QEMU environment and prepare host almost the same, only differences are
- in QEMU, apt install doesn’t needs to install qemu-efi and bridge-utils
- in QEMU, before call dpdk-devbind command, it needs to configure enable_unsafe_noiommu_mode for ARM64 platform
- Hugepage size is different , in HOST it uses 32G, in VM we uses 4G
Enable unsafe noiommu
echo 1 > /sys/module/vfio/parameters/enable_unsafe_*
To permanently enable the no-IOMMU mode, add it to modprobe.d: (ref)
echo "options vfio enable_unsafe_noiommu_mode=1" > /etc/modprobe.d/vfio-noiommu.conf
It also needs to reserve hugepages memory space for Linux kernel for VM, it reserves 4 pages and each pages 1GB, total 4GB. Please modify /etc/default/grub , and add hugepagesz=1GB hugepages=4 to GRUB_CMDLINE_LINUX, ex:
GRUB_CMDLINE_LINUX=”console=tty0 hugepagesz=1GB hugepages=4″
then run foloowing command to update grub.cfg
update-grub
Run DPDK l3fwd
Before run l3fwd, we need to recompile it.
. /usr/share/dpdk/dpdk-sdk-env.sh
make -C /usr/share/dpdk/examples/l3fwd
Bind network interface
dpdk-devbind -b vfio-pci  enp0s1
dpdk-devbind -b vfio-pci  enp0s2
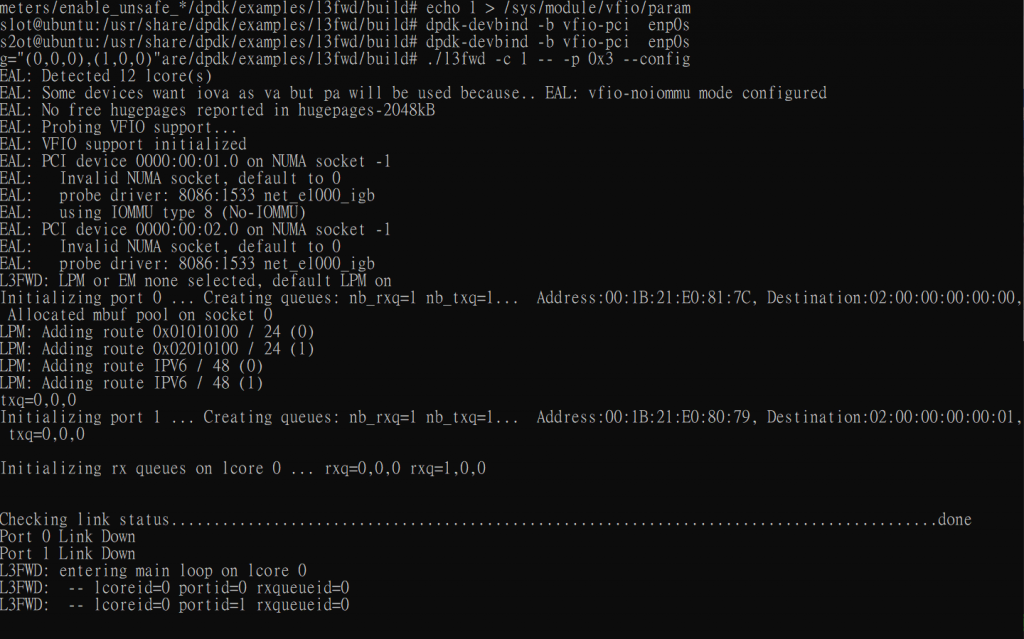
Run l3fwd example
cd /usr/share/dpdk/examples/l3fwd/build
./l3fwd -c 1 -- -p 0x3 --config="(0,0,0),(1,0,0)"
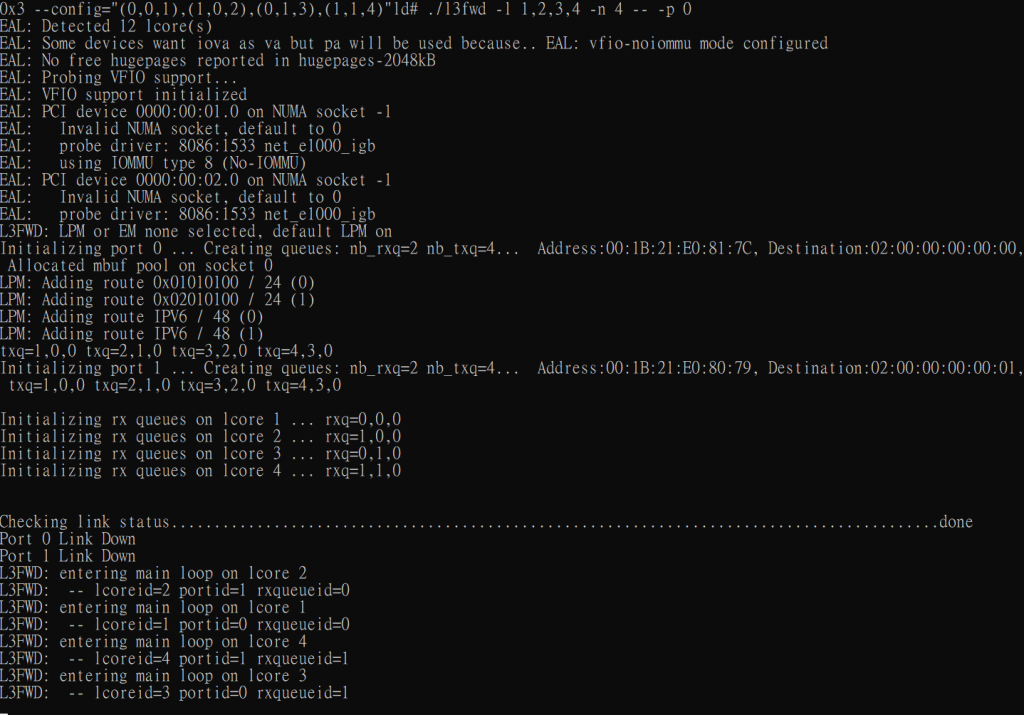
Multi Queue example
./l3fwd -l 1,2,3,4 -n 4 -- -p 0x3 --config="(0,0,1),(1,0,2),(0,1,3),(1,1,4)"
Other
There is good tool to get hugepage information
apt install hugepages
hugeadm --pool-list


發佈留言