
Install Kubernetes on Ubuntu 18.04 is very easy now, but only for x86 platform. If on ARM64 environment, it might have some other problem.
Some old article mentioned a lot of information but software version is too old for deploy a new version software.
After a lot of time to have research, here is instruction for how to install Kubernetes on ARM64 Ubuntu 18.04
Environment
Hardware : Ampere eMag Server with 128G RAM and 1T storage
Kubernetes master and nodes are running in QEMU image, so, we prepared three QEMU ARM64 ubuntu 18.04 images for kubernetes running. It also can use two VM to run this demo.
Prepare QEMU Image
It can download Ubuntu bionic cloud image from Taiwan mirror site
wget http://ftp.yzu.edu.tw/Linux/ubuntu-cloud-images/bionic/current/bionic-server-cloudimg-arm64.img
or international mirror site
https://cloud-images.ubuntu.com/bionic/current/bionic-server-cloudimg-arm64.img
Install Necessary Package
Run following command to install necessary packages .
apt install -y qemu-system-arm bridge-utils cloud-image-utils git qemu-efi
Increase QEMU image size
qemu-img resize bionic-server-cloudimg-arm64.img +200G
Create UEFI bios and nvram for qemu image boot.
dd if=/dev/zero of=flash0.img bs=1M count=64
dd if=/usr/share/qemu-efi/QEMU_EFI.fd of=flash0.img conv=notrunc
dd if=/dev/zero of=flash1.img bs=1M count=64
Copy Image to three spare images
cp flash0.img flash0-1.img
cp flash0.img flash0-2.img
cp flash0.img flash0-3.img
cp flash1.img flash1-1.img
cp flash1.img flash1-2.img
cp flash1.img flash1-3.img
cp  bionic-server-cloudimg-arm64.img   bionic-server-cloudimg-arm64-1.img
cp  bionic-server-cloudimg-arm64.img   bionic-server-cloudimg-arm64-2.img
cp  bionic-server-cloudimg-arm64.img   bionic-server-cloudimg-arm64-3.img
Set up bridge and network devices
We already install bridge-utils before, now, it should configure bridge devices.
mkdir -p /etc/qemu ; echo "allow br0" > /etc/qemu/bridge.conf
Because there is only one network interface on machine, we should use this interface as bridge device, save text below (name nic-br.sh or what you like) and modify it to fit your environment.
ORIGNIC=enP6p1s0
ip addr flush $ORIGINIC
brctl addbr br0
brctl addif br0 $ORIGINIC
ifconfig br0 up
ifconfig br0 192.168.110.1 netmask 255.255.0.0
route add default gw 192.168.1.1
echo nameserver 8.8.8.8 >> /etc/resolv.conf
Configure Hugepage On Host Site (Option)
Due to previous research on dpdk runs on ARM64 server, so, configure hugepages here. But not necessary for run k8s environment.
You can ignore this part
Configure Line Kernel boot command
It needs to reserve hugepages memory space for Linux kernel, it reserves 32 pages and each pages 1GB, total 32GB. Please modify /etc/default/grub , and add hugepagesz=1GB hugepages=32 to GRUB_CMDLINE_LINUX, ex:
GRUB_CMDLINE_LINUX="console=tty0 hugepagesz=1GB hugepages=32"
then run foloowing command to update grub.cfg
update-grub
Mount hugetlbfs by default
If wants to use hugepage, it needs to mount hugetlbfs somewhere, we can create a directory, ex: /mnt/hugepages and mount hugetblsfs there by default.
mkdir -p /mnt/hugepages
echo "nodev   /mnt/hugepages                  hugetlbfs       defaults,pagesize=1G    0 0 none" >> /etc/fstab
Now, please reboot to make huagpage works.
Running QEMU
Following is QEMU script, save it (ex: named run-qemu.sh). It can be more simplification, but this script would be more understand what different.
IMAGE1=bionic-server-cloudimg-arm64-1.img
sudo qemu-system-aarch64 -name vm1 \
         -machine virt,gic_version=3,accel=kvm,usb=off \
         -cpu host -m 8192 \
         -uuid d0000000-1111-1111-1111-11111aaaaaaa \
         -smp 12,sockets=1,cores=12,threads=1 \
         -nographic -nodefaults \
         -pflash flash0-1.img -pflash flash1-1.img \
         -drive file=$IMAGE1,if=none,id=disk1 \
         -device virtio-blk-device,scsi=off,drive=disk1,id=virtio-disk1,bootindex=1 \
         -netdev tap,id=net0,ifname=tap0 \
         -device virtio-net-device,netdev=net0,mac=52:54:00:11:11:11 \
         -mem-path /mnt/hugepages \
         -serial telnet::9001,server,nowait > guest_log-1.txt 2>> guest_log-1.txt &
IMAGE2=bionic-server-cloudimg-arm64-2.img
sudo qemu-system-aarch64 -name vm2 \
         -machine virt,gic_version=3,accel=kvm,usb=off \
         -cpu host -m 8192 \
         -uuid d0000000-2222-2222-2222-22222bbbbbbb \
         -smp 12,sockets=1,cores=12,threads=1 \
         -nographic -nodefaults \
         -pflash flash0-2.img -pflash flash1-2.img \
         -drive file=$IMAGE2,if=none,id=disk2 \
         -device virtio-blk-device,scsi=off,drive=disk2,id=virtio-disk1,bootindex=1 \
         -netdev tap,id=net2,ifname=tap1 \
         -device virtio-net-device,netdev=net2,mac=52:54:00:22:22:22 \
         -mem-path /mnt/hugepages \
         -serial telnet::9002,server,nowait > guest_log-2.txt 2>> guest_log-2.txt &
IMAGE3=bionic-server-cloudimg-arm64-3.img
sudo qemu-system-aarch64 -name vm3 \
         -machine virt,gic_version=3,accel=kvm,usb=off \
         -cpu host -m 8192 \
         -uuid d0000000-3333-3333-3333-33333ccccccc \
         -smp 12,sockets=1,cores=12,threads=1 \
         -nographic -nodefaults \
         -pflash flash0-3.img -pflash flash1-3.img \
         -drive file=$IMAGE3,if=none,id=disk3 \
         -device virtio-blk-device,scsi=off,drive=disk3,id=virtio-disk1,bootindex=1 \
         -netdev tap,id=net3,ifname=tap2 \
         -device virtio-net-device,netdev=net3,mac=52:54:00:33:33:33 \
         -mem-path /mnt/hugepages \
         -serial telnet::9003,server,nowait > guest_log-3.txt 2>> guest_log-3.txt &
sleep 5
brctl addif br0 tap0
brctl addif br0 tap1
brctl addif br0 tap2
There are some parameters need to understand in QEMU script.
-uuid d0000000-1111-1111-1111-11111aaaaaaa \
this will assign a unique uuid for each VM, k8s needs different VM run with different uuid and MAC address.
It also can use command “uuidgen” to generate different uuid for each VM, but here just for debug so assign a “easy to read” uuid.
-device virtio-net-device,netdev=net3,mac=52:54:00:33:33:33 \
Assign a special mac address for VM, because for k8s internal communication, use the same mac address will cause problem, please configure different address before run qemu script. It not easy to modify it after first boot (with cloud image)
* Notice, first number for mac address cannot be odd , it would cause problem.
-mem-path /mnt/hugepages \
Tell VM to use hugepage, if were not configure host with hugepage, please remove this line.
Now, please run scripts
bash nic-br.sh
bash run-qemu.sh
Now, it can use telnet to connect each VM’s console
telnet localhost 9001
# or
telnet localhost 9002
# or
telnet localhost 9003
After system booted/initialed, if you cannot login, please “killall qemu-system-aarch64” and follow this article Change Ubuntu Cloud Image Password to change all images’s password.
Somehow, for recent cloud image, it cannot modify password before run qemu script.
Install Kubernetes
There are a lot of article to talk about how to install on Ubuntu, I choice one for reference : Install and Deploy Kubernetes on Ubuntu 18.04 LTS
Below will shortly note install command here.
Install Docker and Kubeadm on every node
sudo apt update
sudo apt -y upgrade

# install and enable docker
sudo apt -y install docker.io
sudo systemctl enable docker
sudo systemctl start docker

# Install k8s
sudo apt -y install apt-transport-https curl
curl -s https://packages.cloud.google.com/apt/doc/apt-key.gpg | sudo apt-key add
sudo apt-add-repository "deb http://apt.kubernetes.io/ kubernetes-xenial main"
sudo apt update
sudo apt-get install kubeadm -y
Configure Network IP address (Optional)
Update to you network environment, here we used fix ip address.
Add new record to /etc/hosts
192.168.110.50     k8s-master
192.168.110.60     k8s-worker-node1
192.168.110.70     k8s-worker-node2
Please modify /etc/netplan/50-cloud-init.yam, remove dhcp and add fix address. remember, each node has different IP. Following is only for k8s-master.
network:
     ethernets:
         eth0:
             addresses: [192.168.110.50/16,]
             gateway4: 192.168.1.1
             nameservers:
                 addresses: [8.8.8.8,8.8.4.4]
             match:
                 macaddress: '52:54:00:11:11:11'
             set-name: eth0
     version: 2
Configure Host name
Run following command on master node
sudo hostnamectl set-hostname k8s-master
Run following command on other nodes
sudo hostnamectl set-hostname   k8s-worker-node1
sudo hostnamectl set-hostname   k8s-worker-node2
Disable swap (Option)
if image is not from cloud image, default Linux enabled swap function, k8s doesn’t support it, please disable it manually on all nodes and remove swap mount in /etc/fstab.
sudo swapoff -a
Configure Kubernetes
Now, we can initial Kubernetes. Run following command
sudo kubeadm init --pod-network-cidr=10.244.0.0/16
wait for few minutes, it will show some result like this
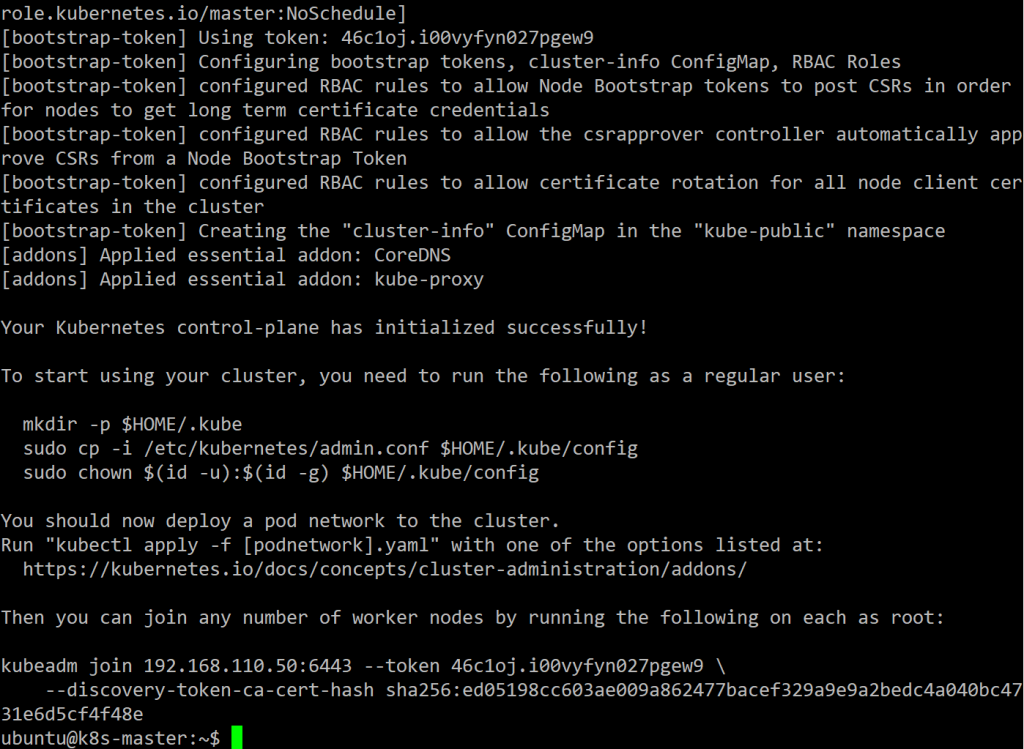
Run following command to assign current account has right to access k8s.
mkdir -p $HOME/.kube
sudo cp -i /etc/kubernetes/admin.conf $HOME/.kube/config
sudo chown $(id -u):$(id -g) $HOME/.kube/config
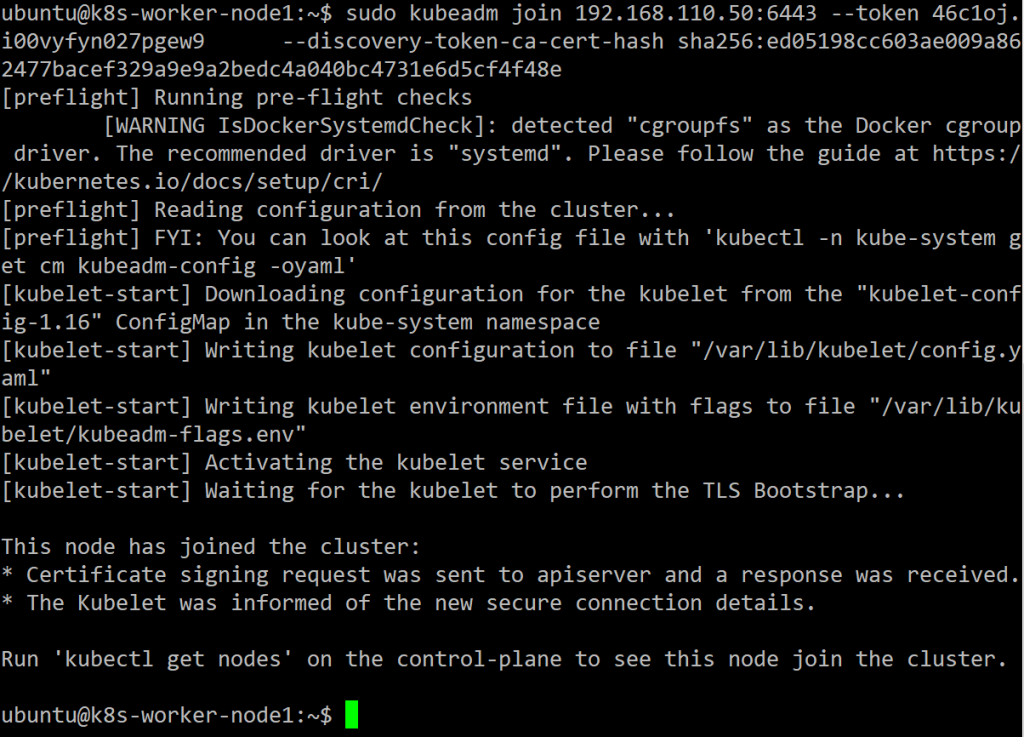
Run this command on another node(k8s-worker-node1 and k8s-worker-node2).
sudo kubeadm join 192.168.110.50:6443 --token 46c1oj.i00vyfyn027pgew9 \
     --discovery-token-ca-cert-hash sha256:ed05198cc603ae009a862477bacef329a9e9a2bedc4a040bc4731e6d5cf4f48e
Run get nodes command, it will show current status, the master node status is NotReady, but don’t worry, it will become Ready after add pod and CNI (container networking interface) plugin.
ubuntu@k8s-master:~$ kubectl get nodes
 NAME         STATUS     ROLES    AGE     VERSION
 k8s-master   NotReady   master   3m42s   v1.16.0
This action is very import on ARM64 k8s platform, in other document, they told you use flannel or some other document told you used old flannel. all of them not work for me. Please instead flannel with weave net.
(Ref Weave Net for NetworkPolicy and CoreDNS is not starting on Ubuntu 18.04.Bionic Beaver #980)
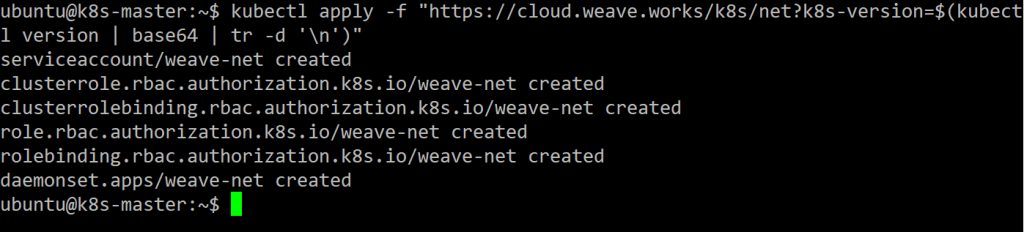
Run following command to install weave net
kubectl apply -f "https://cloud.weave.works/k8s/net?k8s-version=$(kubectl version | base64 | tr -d '\n')"
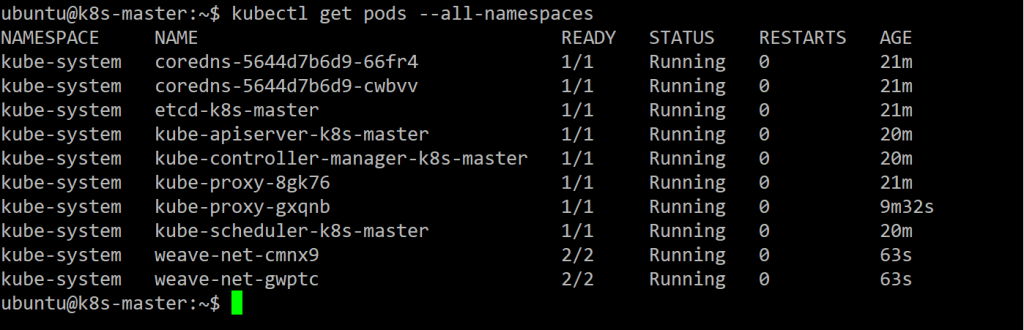
Use the following command to view the status of the network:
Get nodes again.

Great!! it works.
MicroK8s
If you think steps above are too complex and you would like to only run k8s on one machine, microk8s is a good friend for you, can run on ARM64 and very easy to use, just run command
sudo snap install microk8s
And just add a prefix “microk8s.” before k8s command, ex:
microk8s.kubectl get nodes

See, it’s very easy to use. right?

發佈留言