
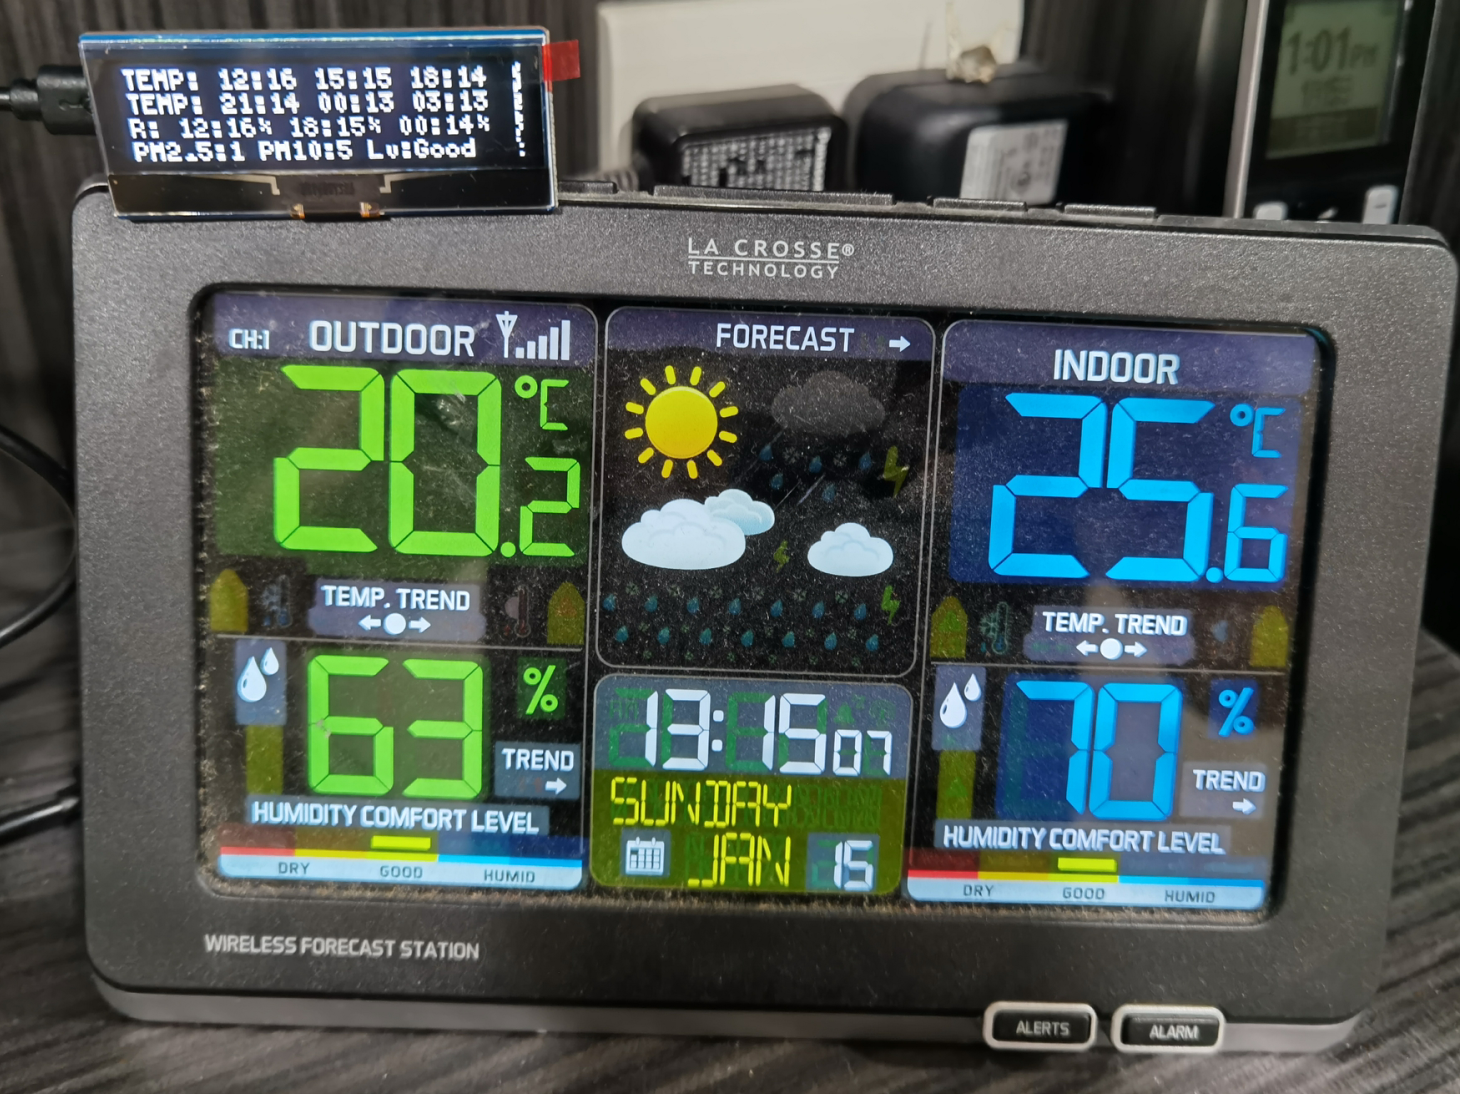
有時候人生就是不能亂買東西,一步錯步步錯,然後就弄了這個出來,當然不是圖中大螢幕的屋內屋外溫濕度狀況,而是左上角小小的溫度預測
至於怎麼來的,一切都要從邪惡的阿媽爽60元免運說起,因為60元免運,有時候就會將有些小東西放到購物車內,因為有時候即使加了稅金,從美亞(美國亞馬遜Amazon)網站買東西還比淘寶買便宜,更不要說很多東西只有美亞有,這時候小東西湊60元免運頗方便的
原來是我有二張 Arduino 的板子,本來也只是接來做溫度偵測,也沒有什麼用,想說接個小螢幕顯示一下天氣預報,但是這東西又不是很必要,就想想而已,就隨便找了一個看起來順眼的 SPI LCD 和 OLED (想說比較省電)就放到購物車了,上個月美國很多東西都特價,兩雙鞋子才 30 元美金,這塊 OLED 好像也才 15 上下,就被拿來湊運費了,沒想到我手上並沒有東西可以接
Waveshare 2.23 inch OLED
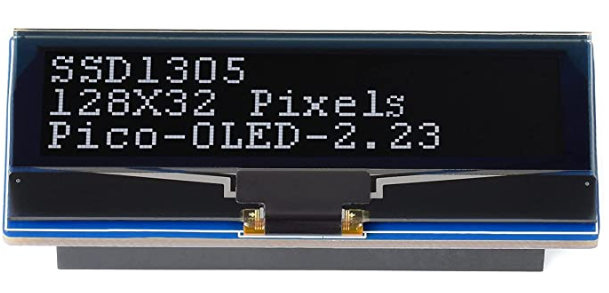
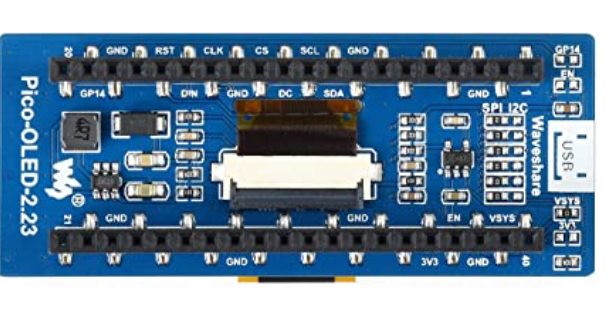
這片是 Waveshare Pico OLED 2.23 是一片 2.23 吋的 OLED 螢幕,內建 SSD1305 driver ,可以用 SPI/I2C bus 驅動
最大的優勢是,他可以和 Raspberry Pi Pico 的接頭整合在一起
不過我買來之後就傻眼了,因為我以為只是 SPI 螢幕,但是沒有 Raspberry Pi Pico 啊~(謎之音,藉口,明明可以外接)所以本來想接 Arduino 的,只好就買了一片 Raspberry Pi Pico W ,Raspberry Pi Pico W 是有 WiFi 的版本,我想說都要買了,買有 WiFi 的比較方便
如果有去 Amazon 網站上會有一行字提到,事後來看可能是地雷
The built-in controller used in this OLED is SSD1305, which has 132 × 64 bit SRAM, supports a maximum 132 × 64 pixels screen, supports SPI/I2C/8bit 8080 parallel port. The solution of this screen is 128 × 32 pixels, so the internal SRAM is not fully used. This module uses four-wire SPI and I2C interfaces, with good compatibility and high transmission speed.
至少以目前看到的資料,只有他的 demo code 可以用,其他沒找到有人成功使它完全正常工作的範例
系統架構
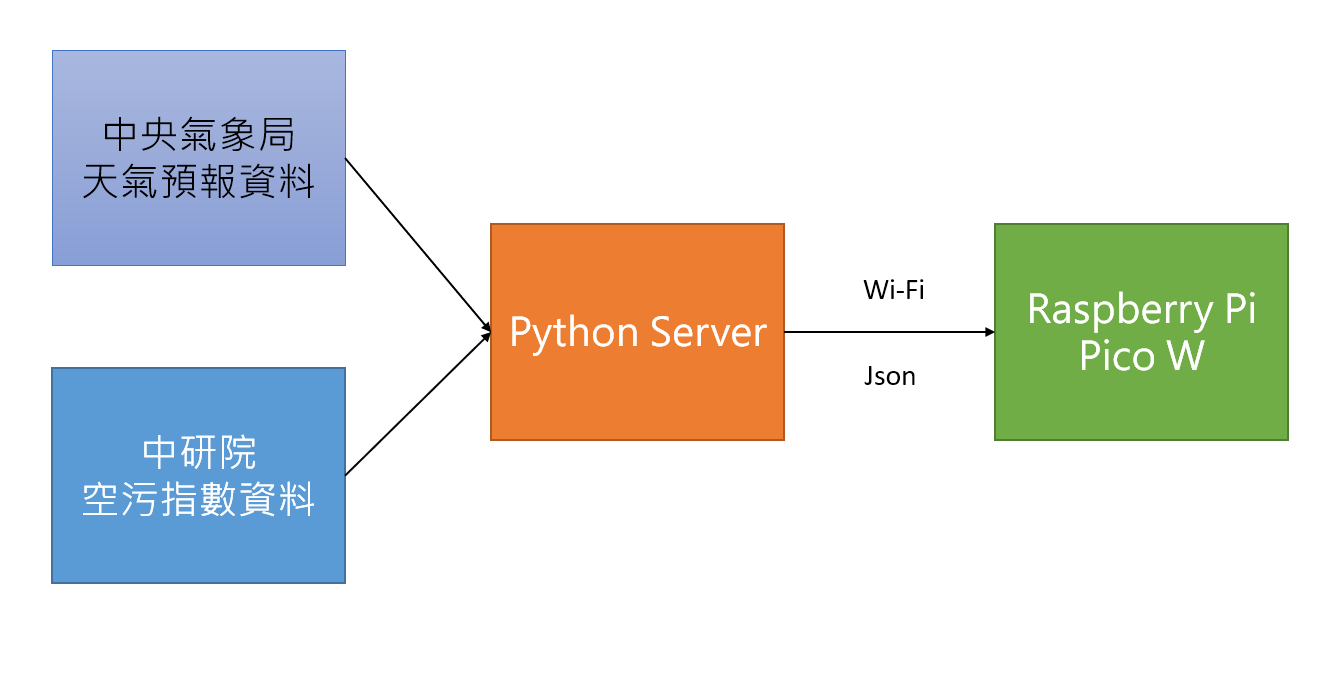
架構如上,不過為什麼要多一個中介 Server 呢?因為在 PC 上改 code 還是簡單速度快,Arduino 的開發環境很怪, compile 很慢,而整個開發驗證流程太長,我也沒要商業化,當然是選自己好用的為主
中間互丟就用 udp 就好,簡單速度快還沒有什麼多有的沒有的事情,畢竟一組 packet 也不會超過 1K
Raspberry Pi Pico W
Raspberry Pi Pico W 是 RP2040 (ARM Cortex M0+ 雙核處理器) 的 CPU + Infineon CYW43439 WiFi 和藍牙,其他就看看規格吧,Raspberry Pi Pico 預設的開發環境是 MicroPython ,用的是 Thonny 這個 IDE
另外一個就是使用 Arduino 加上 arduino-pico 套件
我最後是選了 Arduino + Pico SDK 套件,好吧,我也忘了當初是因為什麼會用 Arduino 這個組合的,大概是 Arduino 之前寫過,比較熟悉吧
對了,在跑 Arduino raspberry Pi pico 的 sample code 時,不要選 Fade 或是點 LED 這種網路上常見的 sample code ,因為 Raspberry Pi pico 的 LED 是放在 WiFi 那邊,不是 GPIO 直出,所以只是要驗證可不可以用,example code 請選 teampterature 就好
Arduino
其實 Arduino 的使用還算方便,但是我想到的組合會踏到一個一般人的地雷,ArduinoJson 要使用 C++,但是因為不是用到很複雜的功能,所以抄一抄還可以
Arduino 要設定 Additional Boards Manager URLs ,請按照arduino-pico 的說明文件,加上 https://github.com/earlephilhower/arduino-pico/releases/download/global/package_rp2040_index.json
在安裝的過程中,Windows 所有的 driver 都請同意安裝,否則可能會有奇怪的問題
Tool -> manager Libraries 請安裝 ArduinoJson 和 U8g2 Library
Python Server
抓取資料的部份主要是參考之前的作品 Python 取得 PM2.5 和天氣資訊,不過都過了這麼久了,有些部份不一樣,例如文內的 PM2.5 就變 pm2.5
預測天氣部份就使用氣象局的資料,氣象局有針對各縣市鄉鎮的未來二天預報資料,找到你自己要的鄉鎮,再取出資料即可,以新北市來說是 F-D0047-069
天氣預測資料
以下是抓出未來 18 小時共六筆的溫度預測和未來 18 小時三筆的降雨預測資料
 res = "https://opendata.cwb.gov.tw/fileapi/v1/opendataapi/F-D0047-069?Authorization=[請填入你的KEY]D&format=JSON"

        while True:
            try:
                with urllib.request.urlopen(res) as url:
                    data = url.read()
            except urllib.error.URLError as e:
                self.LOG.error(e)
                return -1
            try:
                my_object = json.loads(data.decode('utf-8'))
            except:
                self.LOG.error("Json Error")
                return -1

            item = my_object['cwbopendata']['dataset']['locations']['location']

            for i in range(len(item)):
                if item[i]['locationName'] == "鶯歌區":
                    for j in range(len(item[i]['weatherElement'])):
                        if item[i]['weatherElement'][j]['elementName'] == "T":
                            weather_time_value = item[i]['weatherElement'][j]['time']
                            # 抓出每一個時間和溫度
                            for k in range(len(weather_time_value)):
                                weather_date = weather_time_value[k]['dataTime']
                                data_time = datetime.strptime(weather_date, '%Y-%m-%dT%H:%M:%S%z')
                                clock_string = data_time.strftime('%H')
                                tw_weather.w_data["temp"][clock_string] = weather_time_value[k]['elementValue']['value']
                                self.LOG.debug("now is %s temp is %s" % (clock_string, weather_time_value[k]['elementValue']['value']))
                                # 每三小時一筆,取 18 小時的數據
                                if k >= 5:
                                    break
                        # PoP6h 六小時降雨機率
                        if item[i]['weatherElement'][j]['elementName'] == "PoP6h":
                            weather_rain_value = item[i]['weatherElement'][j]['time']
                            # 抓出每一個時間和溫度
                            for k in range(len(weather_rain_value)):
                                weather_date = weather_rain_value[k]['startTime']
                                data_time = datetime.strptime(weather_date, '%Y-%m-%dT%H:%M:%S%z')
                                clock_string = data_time.strftime('%H')
                                tw_weather.w_data["rain"][clock_string] = weather_rain_value[k]['elementValue']['value']
                                self.LOG.debug("now is %s rain is %s" % (clock_string, weather_rain_value[k]['elementValue']['value']))
                                # 每六小時一筆,取 24 小時的數據
                                if k >= 3:
                                    break
UDP Server
UDP server 就很簡單,收到資料就將 json 資料丟出去就好,因為資料量少應該不會出問題吧
    def udp_server(self):
        sock = socket.socket(socket.AF_INET, socket.SOCK_DGRAM)
        sock.bind(("0.0.0.0", 9999))

        self.LOG.info("Server IP address: %s", socket.gethostbyname(socket.gethostname()))

        while True:
            data, addr = sock.recvfrom(1024)

            json_send_data = json.dumps(self.serve_data)
            sock.sendto(json_send_data.encode(), addr)
Arduino Sample Code
Arduino 其實對開發者很友善,安裝 Pico W 套件的時候內有大量的 Sample code ,WiFi 部份就照抄 Sample code 就可以了,這部份不是很大的問題
UDP Client
不知道大家是不是都不寫 UDP Client ,網路上大部份的範例都是拿 Arduino 當 server 用,而且 WiFiUdp 和 EthernetUDP 也有一點差別,我自己的做法如下
Udp.beginPacket 就可以直接送 packet 出去,送出去之後等待二秒收資料就好,不是很好的做法但是我人懶,不想弄異步傳輸,可以用就好
const char* serverip = "10.0.0.1";
const uint16_t serverport = 9999;
const uint16_t localport = 9999;

void setup(void) {
    Udp.begin(localport);
}

void loop(void){
  Udp.beginPacket(serverip, serverport);
  Udp.write("Hello");
  Udp.endPacket();

  delay(2000);

  int packetSize = Udp.parsePacket();
  if (packetSize){
    Udp.read(packetBuffer, UDP_TX_PACKET_MAX_SIZE);
    packetBuffer[packetSize] = 0;

    // The packet is coming from the remote server
    Serial.println("Received packet from: ");
    Serial.println(Udp.remoteIP());
    Serial.println("Packet is: ");
    Serial.println(packetBuffer);
}
ArduinoJson Sample Code
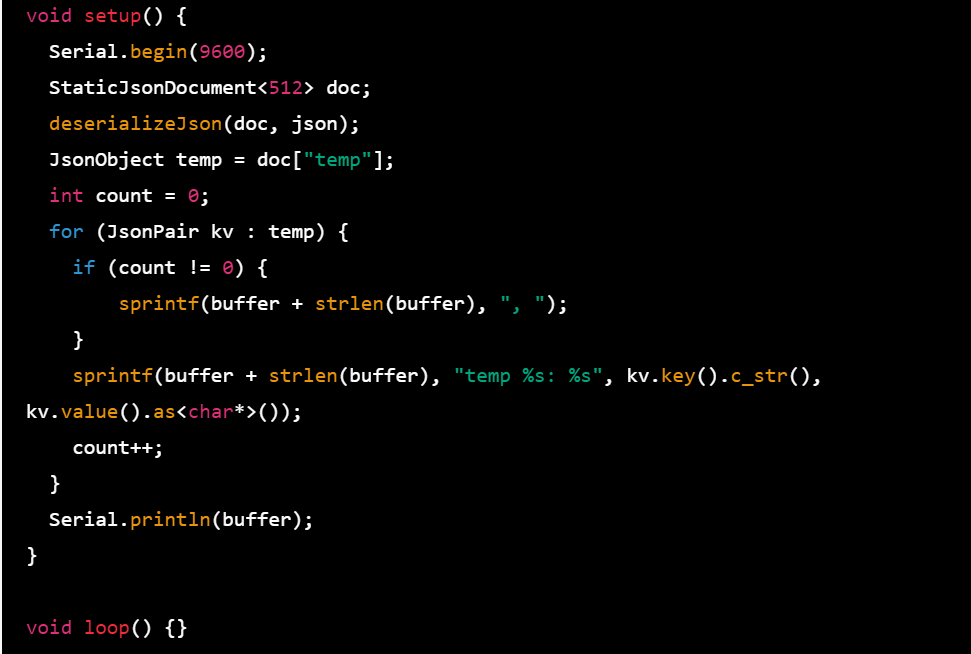
說實在這個用的時候不知道取出 Json 的資料要會一點 C++ ,雖然我也已經不太懂 C++,不過這東西沒有很難,照抄就好,當初會不會不用 Json 比較好?我不知道,不過用用看嘛,我是記得看到已經到很多版了,應該頗多人用,這樣就不用太害怕要自己修 code
但是開發過程中,在這邊碰到當機的問題找了好久,才知道 Arduino 如果程式寫到會當掉,那就要使用 Bootsel 更新,要不然就會一直卡在當機那邊,要不然一直以為是 host 的 driver 爛了
以下是 Sample code
// 網路上的範例 200 太小,以我大概 150 byte 還是要設大一點,要不然也有 DynamicJsonDocument 可以用
StaticJsonDocument<500> doc;
// decode json format
DeserializationError error = deserializeJson(doc, packetBuffer);
if (error) {
Serial.println("Deserialization failed: " + String(error.c_str()));
return;
}
JsonObject temp = doc["temp"];
sprintf(buffer,"TEMP: ");
for (JsonPair kv : temp) {
sprintf(buffer + strlen(buffer), "%s:%s ", kv.key().c_str(), kv.value().as<const char*>());
count++;
if(count > 2){
Serial.println(buffer);
oled_show_generalmsg(5,y,buffer,0);
sprintf(buffer,"TEMP: ");
y = y+ 8;
count = 0;
}
}
// Raining chance
temp = doc["rain"];
sprintf(buffer,"R: ");
count = 0;
for (JsonPair kv : temp) {
sprintf(buffer + strlen(buffer), "%s:%s%% ", kv.key().c_str(), kv.value().as<const char*>());
count++;
// only show 3 records here
if (count > 2)
break;
}
Serial.println(buffer);
oled_show_generalmsg(5,y,buffer,0);
y=y+8;
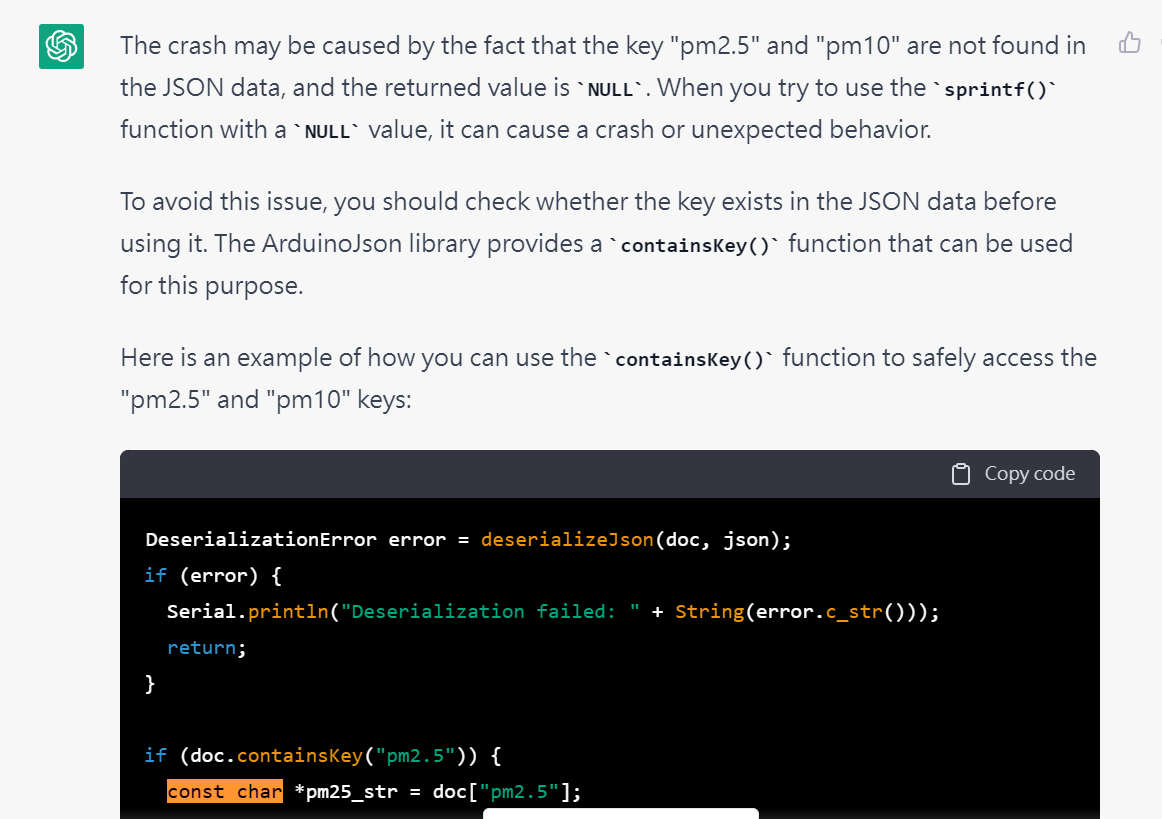
int pm25 = atoi(doc["pm2.5"]);
int pm10 = atoi(doc["pm10"]);
const char *level;
if ( pm25 <15 || pm10 < 50 ){
level = "Good";
} else if ( (pm25 >= 15 && pm25 <35) || (pm10 >= 50 && pm10 < 100)){
level = "Medium";
} else if ( (pm25 >= 35 && pm25 <54) || (pm10 >= 100 && pm10 < 254)){
level = "Bad";
}else{
level = "SBad";
}
sprintf(buffer , "PM2.5:%d PM10:%d Lv:%s", pm25, pm10, level);
Serial.println(buffer);
oled_show_generalmsg(5,y,buffer,0);
u8g2 display Library
這個是 Waveshare Pico OLED 2.23 唯一可以用的 Library ,可能其他 Library 也可以用,但是我沒找到
我試過一些 ssd1305 和 ssd1306 的 library ,像 Adafruit ssd1306 SPI 就可以驅動,可以顯示,但是沒辦法正確顯示
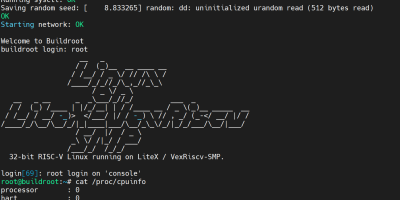
u8g2 只可以顯示,但是在邊界的地方會出問題(請見本文第一張圖最右邊的白色部份),本人並沒有要做產品不想幫廠商 debug 這種事,小小小缺點就眼不見為淨就好
放個 sample code 就好了
u8g2 可以選字體還不錯,也有人教如何顯示中文,不過我沒用到中文就不想試了,對了128×32真是太小了,顯示好擠,還是要買大一點的好,最好是 320×240 還要有觸控
oled_show_generalmsg 是我拿來秀字體用的,但是因為要避開這塊面版的問題,都要 offset 5 pixels (應該有其他解決方案,但是大部份正常我就懶得試了)
顯示字串的部份上面那一塊有 sample code ,下面就不放了
U8G2_SSD1305_128X32_NONAME_F_4W_SW_SPI  u8g2(U8G2_R0, /* clock=*/ 10, /* data=*/ 11, /* cs=*/ 9, /* dc=*/ 8, /* reset=*/ 12);

void oled_show_generalmsg(int x,int y, const char *msg, int clearbuffer=1){
    if (clearbuffer == 1)
        u8g2.clearBuffer();
    u8g2.setFont(u8g2_font_5x8_tr );

    u8g2.drawStr(x,y,msg);
    u8g2.sendBuffer();
}

void setup(void) {
  pinMode(9, OUTPUT);
  digitalWrite(9, 0);	// default output in I2C mode for the SSD1306 test shield: set the i2c adr to 0

  u8g2.begin();
}
Python Server on Docker
最後當然要將 python server 放到 docker 上面去,以下是幾個步驟
產生 Dockerfile
# Use an official Python runtime as the base image
FROM python:3.9

# Set the working directory
WORKDIR /app

# Copy the requirements file
COPY requirements.txt .

# Install the required libraries
RUN /usr/local/bin/python -m pip install --upgrade pip
RUN pip install --no-cache-dir -r requirements.txt

# Copy the Python script
COPY weather.py .

# Run the script
CMD ["python", "weather.py"]
產生 requirement.txt
urllib3
jsonschema
產生 docker image,這個如果程式有改動就要再執行一次
docker build -f Dockerfile -t weatherdaemon .
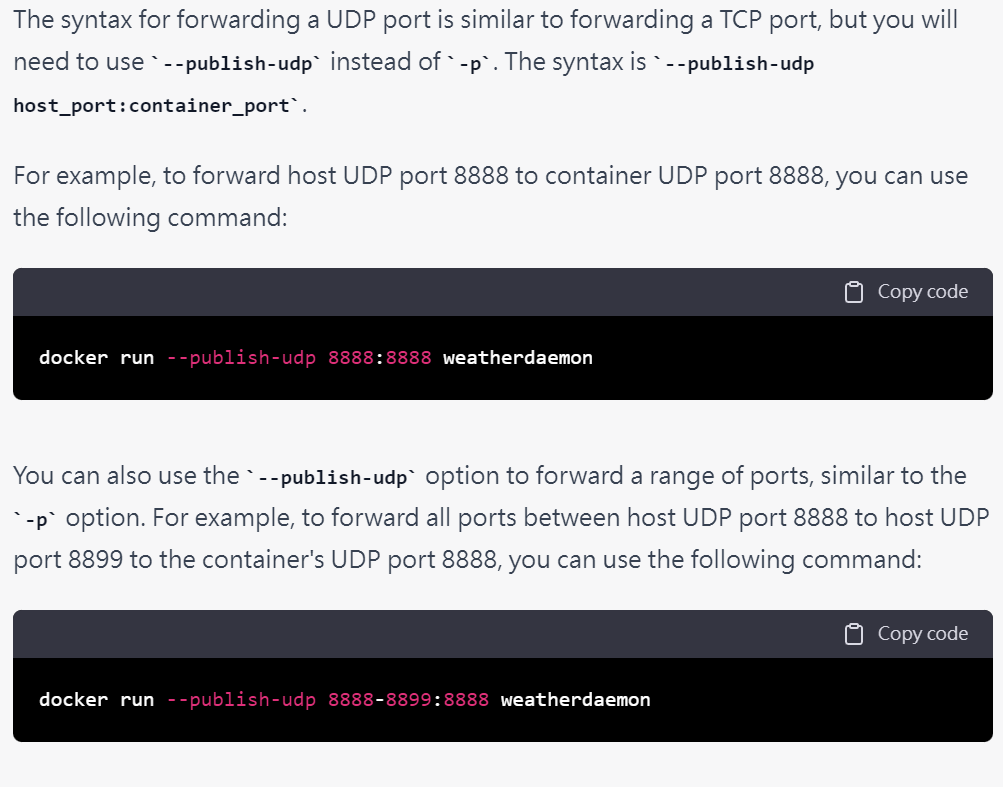
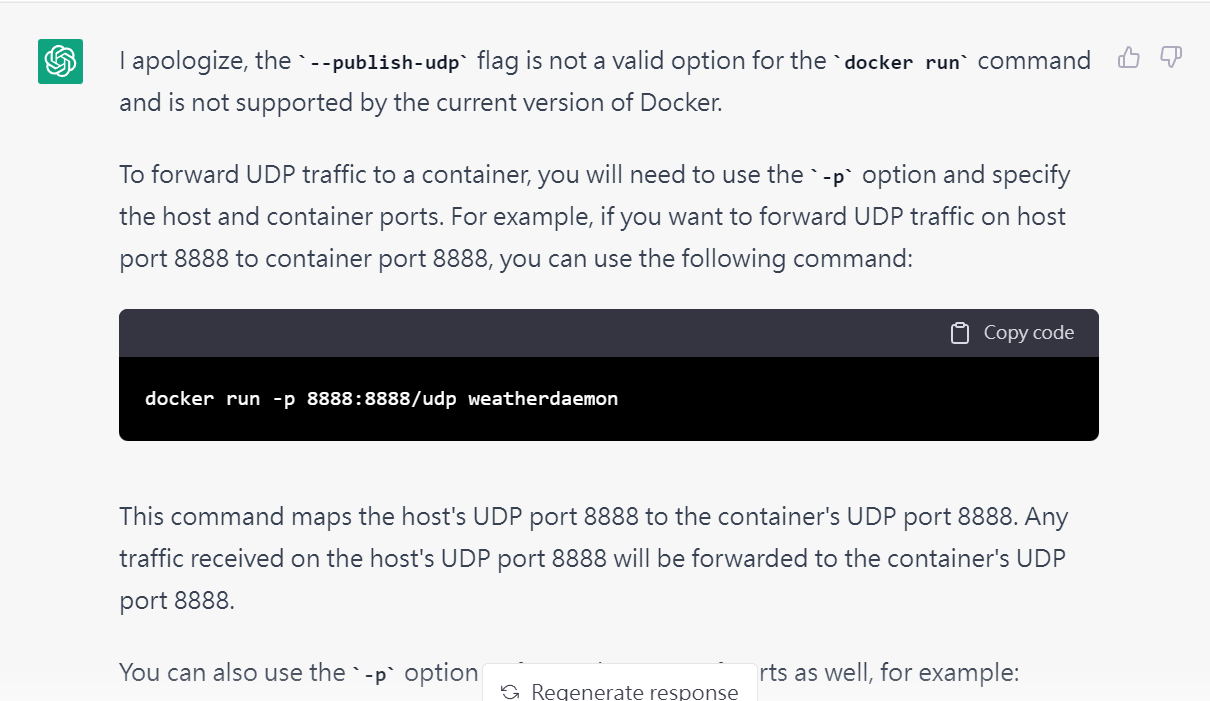
執行 docker ,udp 的 portforwarding 和 tcp 稍稍不一樣,加上 timezome 讓 script debug 顯示的時間更正確
docker run -v /usr/share/zoneinfo/Asia/Taipei:/etc/localtime -p 8888:8888/udp weatherdaemon
# Daemon mode
# docker run -d -v /usr/share/zoneinfo/Asia/Taipei:/etc/localtime -p 8888:8888/udp weatherdaemon
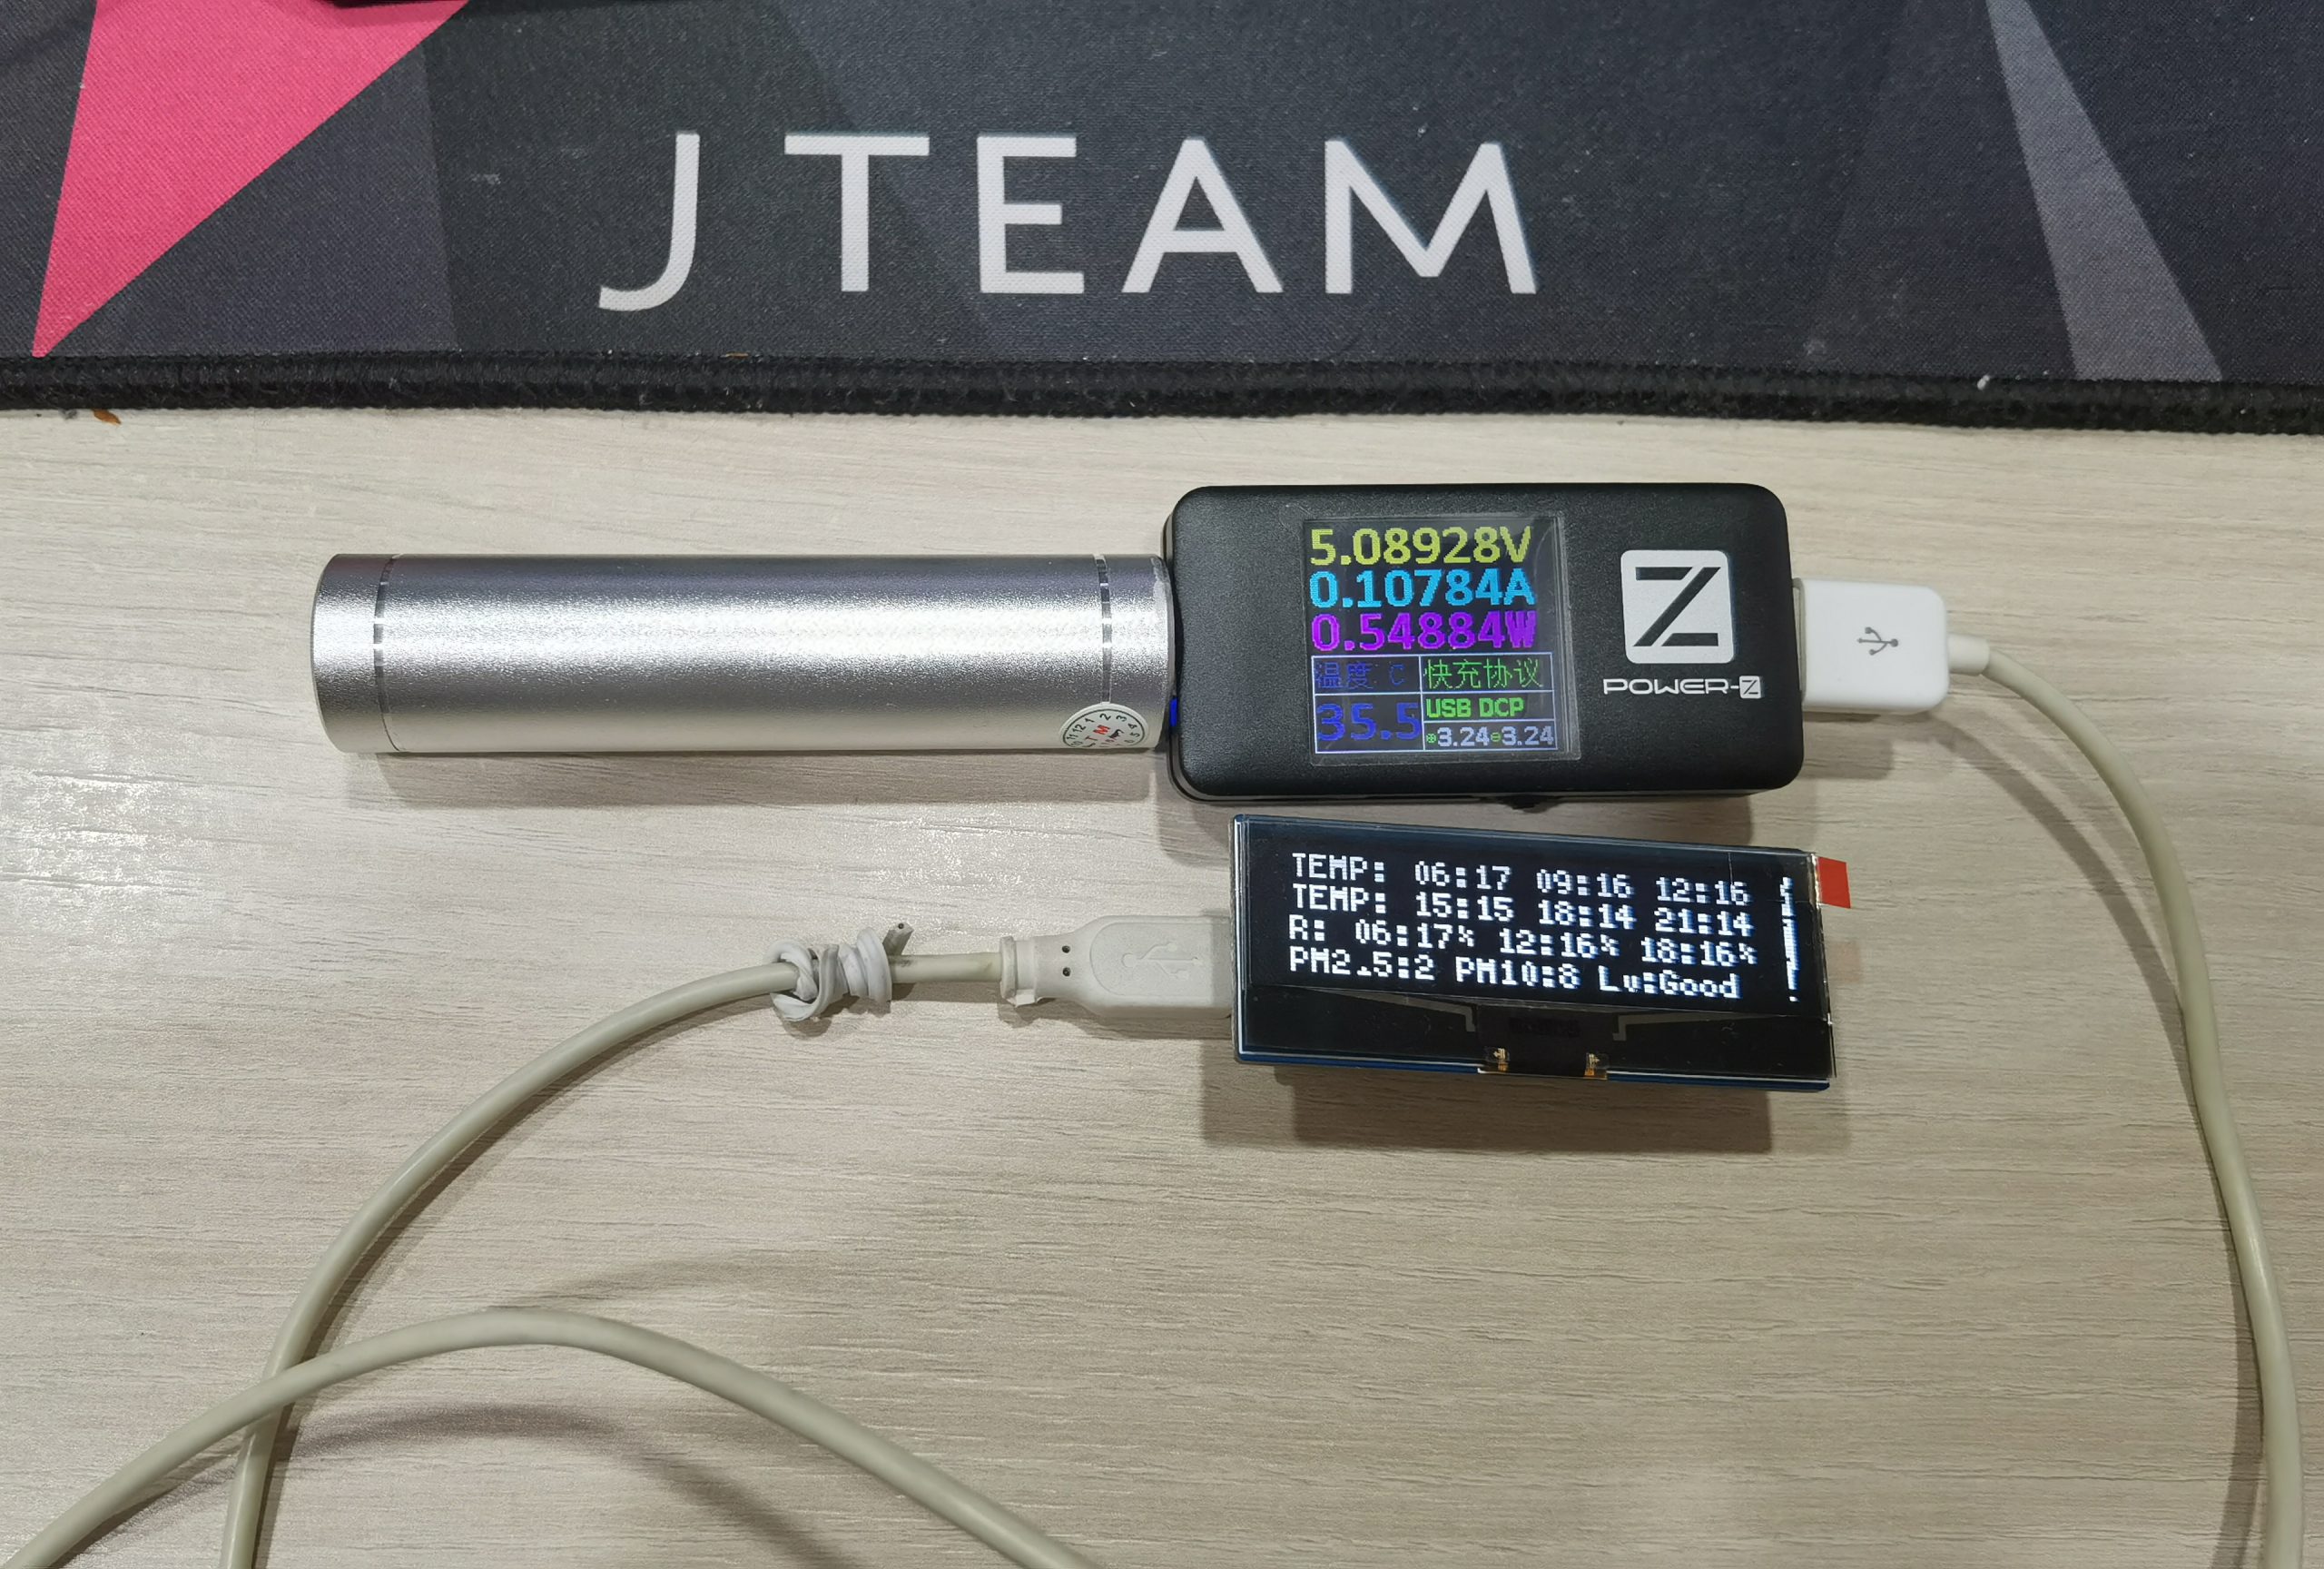
功耗
大功告成,組合測試,都是 embedded system 一定要測一下功耗的啊
大略都在 0.54W 左右,算還可以吧

當然一定要拿一顆 186550 來當行動電源的,這樣就可以到處放了
約略可以顯示 16 小時,算可以了吧,這個耗電量應該還是要插電比較好
ChatGPT
為什麼會有這個,應該不是很意外吧?
這次因為都不是很熟悉的東西,所以很多事情都問 ChatGPT 拿答案
簡單的心得是,比 Google 好用,但是問題很多
原因是因為 Google 會給很多文章,但是這些文章不見得是你要的,或是寫很長一串重點找半天
ChatGPT 總是可以直擊問題給出答案,然後有些問題會很容易翻車,像是
如果是初學者,又沒有排除故障能力,那麼直接用 chatgpt 就會翻車,不過如果是已經懂得怎麼排除問題,又有一定基礎,使用 chatgpt 可以加速很多開發時的工作
總之,這東西如果價格不貴,我會付費使用,而且是常駐在系統上,它能大幅增進我的能力,尤其是現在少寫 code 了,很多東西都忘得差不多了

發佈留言